de.NBI cloud at Bielefeld University
The Bielefeld cloud site currently runs the OpenStack version "Yoga".
Contact
The de.NBI cloud team in Bielefeld can be contacted via email: service(at)bi.denbi.de
Entrypoint
The OpenStack Dashboard as main entry point to the de.NBI Cloud Bielefeld is available at https://cloud.bi.denbi.de.
Endpoints
You can get an up-to-date list of API endpoints of the available services using the dashboard or
the OpenStack command-line tool (openstack endpoint list).
Login
The Bielefeld cloud site supports login using LifeScience AAI via OpenID Connect or default Keystone credentials. Using LifeScience AAI is the preferred way for all cloud users not working at Bielefeld university.
Network
The network configuration abilities are a bit different as described in the Quickstart Guide.
Project network routers are managed by the de.NBI Cloud Bielefeld team. All other network management operations are unrestricted. The routers of the deNBI projects are located in an unrestricted public network.
MTU settings
We make use of a network virtualization technology called Virtual Extensible LAN (VXLAN). The MTU value provided to the network interfaces is 1450 and therefore differs from an expected default value (e.g. 1500). You have to consider this if running docker or any other container technology.
Images
Preconfigured cloud images are available for Ubuntu LTS (20.04, and 22.04) and Debian (11 and 12). These images apply some auto-configuration on boot specific to the cloud site Bielefeld:
- Site-local APT mirror is used as default (only Ubuntu LTS).
- New login style showing important messages from de.NBI cloud site Bielefeld (if there are any).
- Fail2ban (https://github.com/fail2ban/fail2ban) comes preinstalled and configured to monitor SSH access and improve security.
All images are able to run on other cloud sites without any further modifications.
Ubuntu apt mirror
We run an apt mirror for Ubuntu LTS releases (20.04 and 22.04) to speed up package download. The mirror is available at the Bielefeld cloud site through the external (http://apt-cache.bi.denbi.de:9999 or http://129.70.51.2:9999) network. This mirror is synced every midnight with the official Canonical/Debian repositories.
Object storage
The storage backend used by the Bielefeld cloud site is powered by Ceph. The Object storage endpoint provides API access via SWIFT and S3. The latter should be preferred due to better performance. You can find a tutorial here on how to use this service.
Protection against loss of data
Users should be aware, that instances are ephemeral. This means, that instances can go offline for various reasons. This is most likely due to hardware issues on the hypervisor. Users can prepare against this by storing their data in the storage infrastructure of this compute center. For this you can use Snapshots and Volumes. This data is stored redundantly on our Ceph Cluster three times on different locations of the cloud-center. Beware that this does not act as a backup. If you want true backups (which are independent of this cloud-center), you have to copy your data to a safe location, like an external harddrive, for yourself. We do our best to prevent any data loss, but we can't guarantee that 100%. Here is a quick overview about our solutions for storing data:
| Data Location | Description | Performance |
|---|---|---|
| Root Disk | The root disk of an instance is hosted on a RAID10 backend. This means that data is safe against single harddrive failures. However, if the hypervisor itself goes bad your data will be also completely unavailable. | Fast |
| Ephemeral Disk | Some flavors provide an extra disk called "ephemeral disk". While this storage is practical for most use-cases it is also the most unsafe one. They are not included in Snapshots and should be used for temporarily used data. | Fast |
| Volumes | Volumes are stored redundantly in our Ceph-Storage. Since volumes are network-backed storage, random read/write operations performance is significantly slower than using the local disk space. Volumes offer a great solution for storing persistent data since volumes can be swapped to different instances. | Medium - Fast |
| S3 Object Storage | This data is also stored in our Ceph-Storage just like volumes. Access to this data is completely independent from instances since access is done via regular HTTPS. Therefore data in S3 is safe against any hypervisor issues. Performance heavily depends on the client used to access the object storage. A single-threaded connection is slow but can heavily speed up using multiple connections retrieving different chunks of the same object. Pushing data is much slower than retrieving data. | Slow - Fast |
Server Groups for optional performance gains
Our OpenStack cluster consists of multiple compute nodes hosting all running instances. Some applications can benefit if you schedule the instances of your project on as many different compute nodes as possible.
- Distributed systems (like HPC, databases...) can get a significant performance gain.
- Spreading instances over several compute nodes increases the availability when running a high availability setup.
This can be achieved with Server Groups. Server Groups act as a "container" for instances and describe a "policy" on how those instances should be scheduled across the OpenStack Compute nodes.
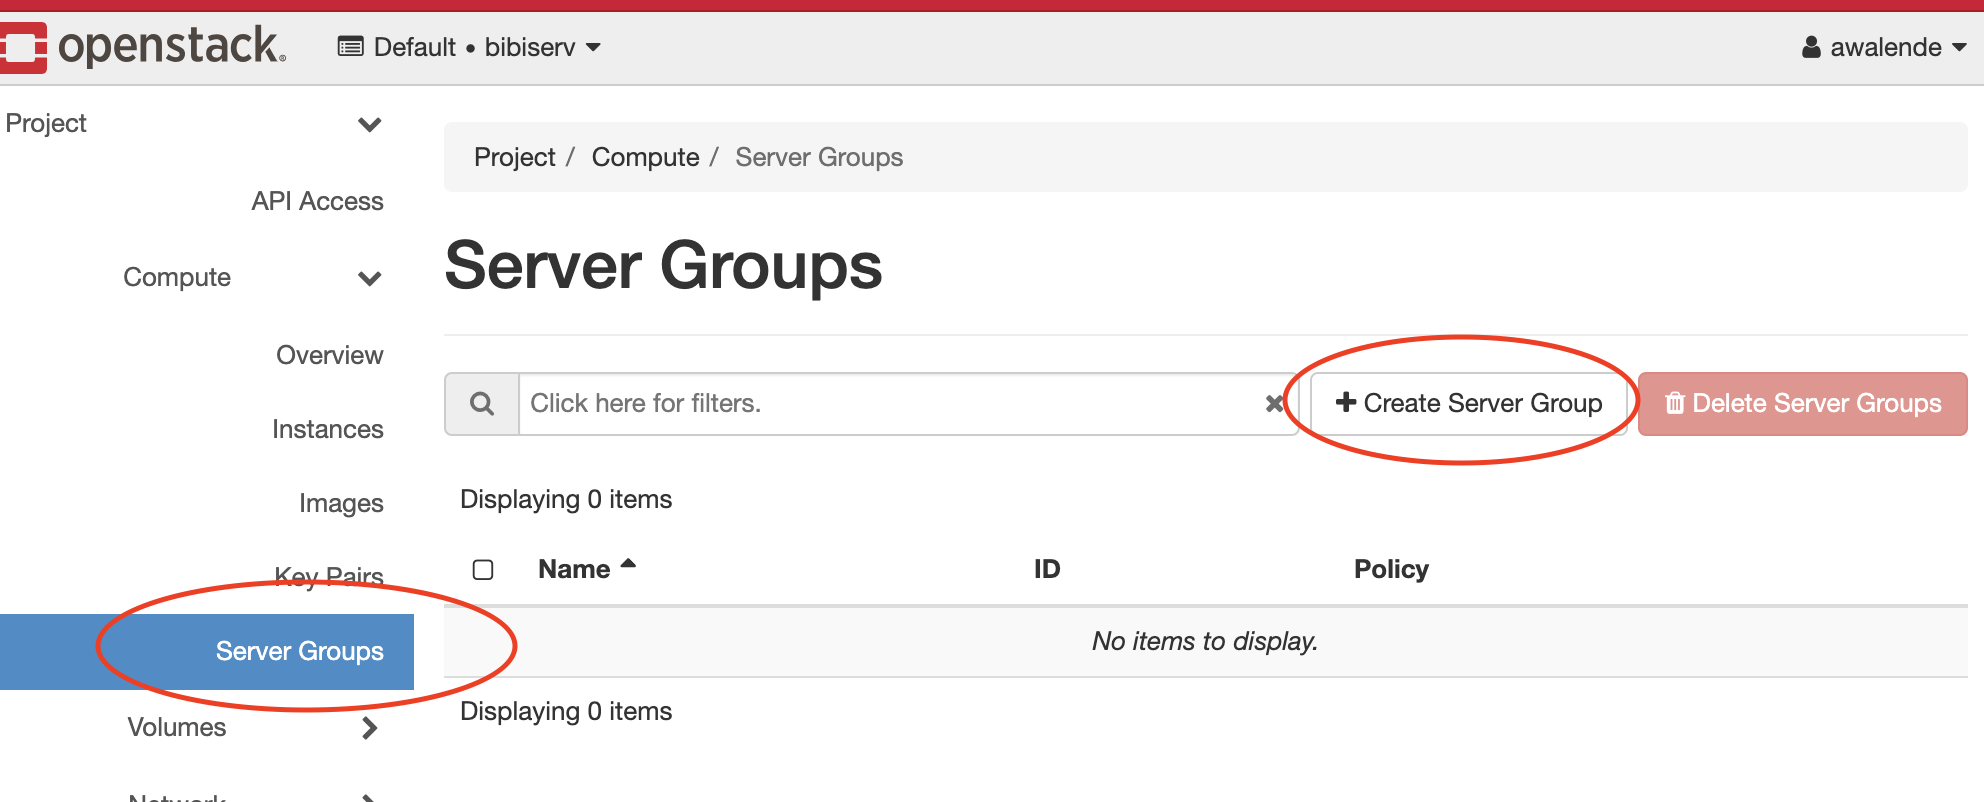
In order to create such Server Group, login to the OpenStack Dashboard and navigate to Compute -> Server Groups.
Afterwards click on Create Server Group:
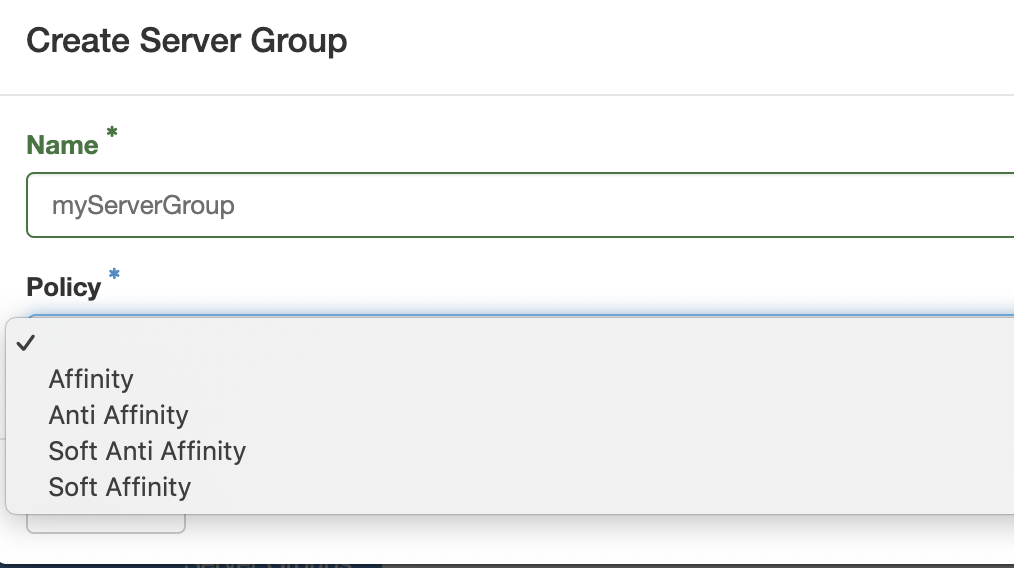
On the new screen, give this security group a name and assign the wanted affinity policy:
The policies are defined as following:
| Policy | Description |
|---|---|
| affinity | Force schedule all instances on one single compute node. |
| soft affinity | Try to schedule all instances on a single compute node. Allow to violate the policy when there is not enough space on this single node. |
| anti affinity | Force schedule all instances as spread as possible on all compute nodes. |
| soft anti affinity | Try to schedule all instances as spread as possible on all compute nodes. Allow to violate this policy when there are not enough compute nodes with such capacity. |
It is recommended to use the "soft" variant. Otherwise, instances can fail to start when they would violate the more strict policy options.
Afterwards the creation of a new Server Group, you can add instances to it when you are creating them.
It's not possible to add already running instances to a Server Group since they are already scheduled.
On the Server Groups tab, add the group by clicking on the small up-arrow:
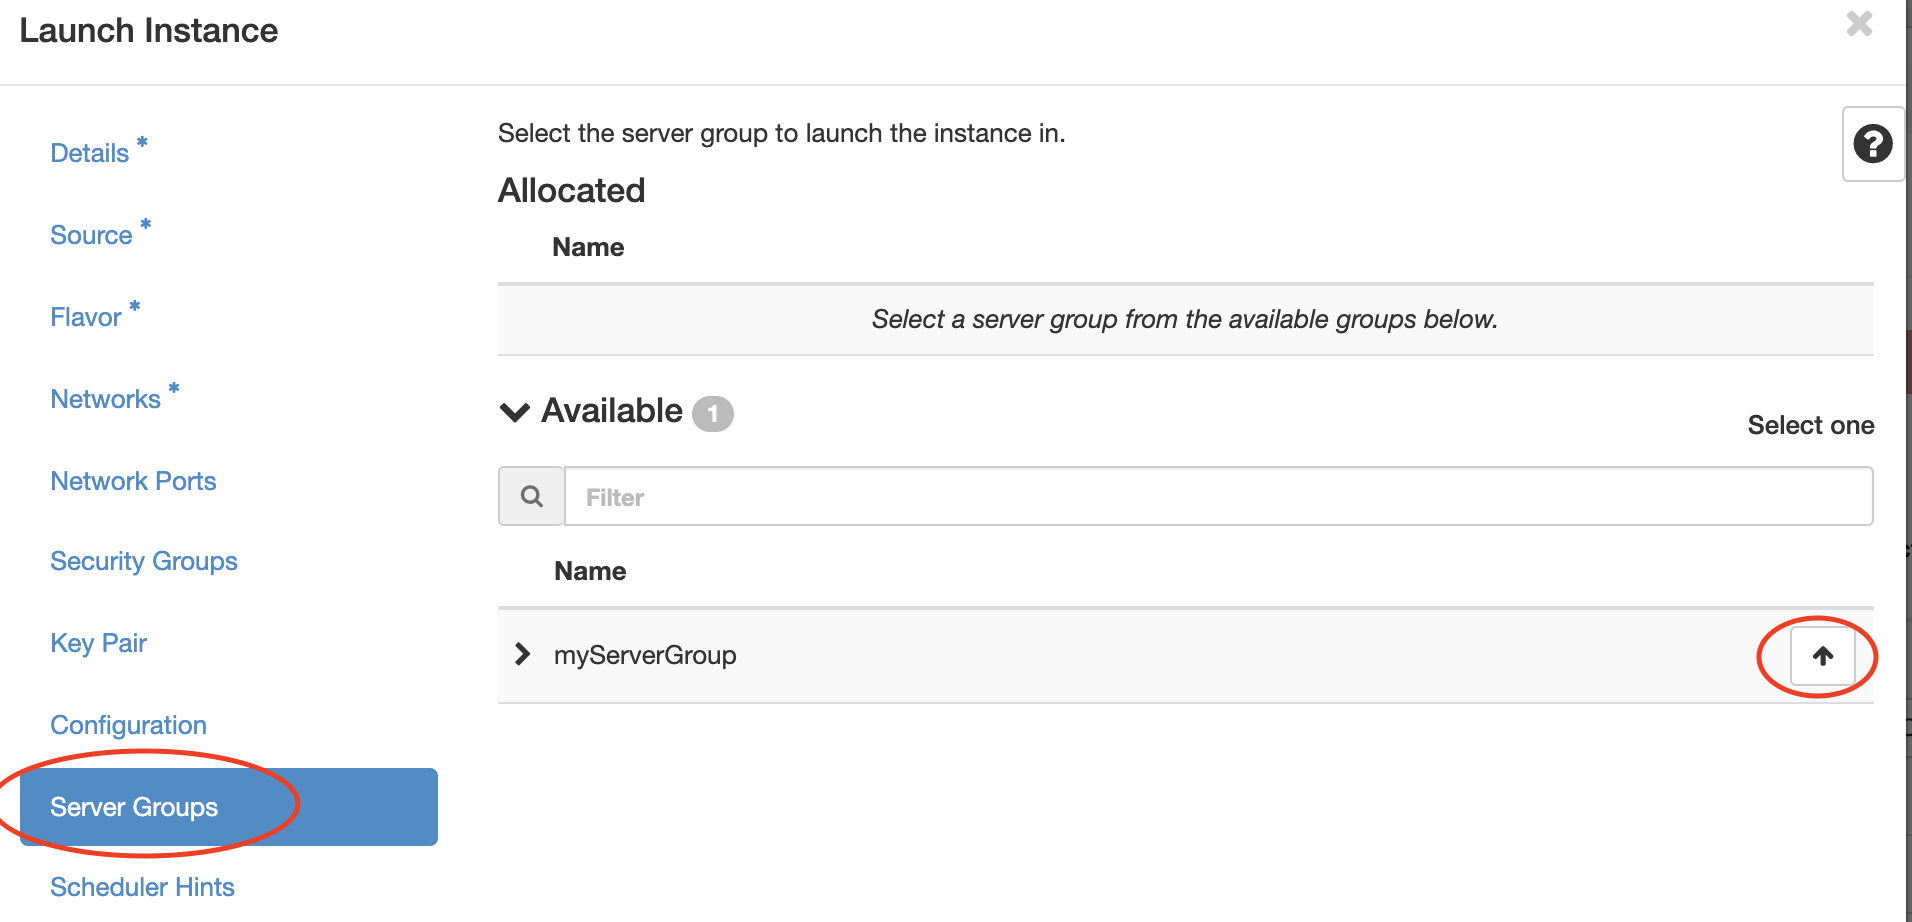
Afterwards, the scheduling of this instance will respect your selected Server Group policy.
Application Credentials (use OpenStack API)
In order to access the OpenStack Cloud via command-line tools, you need to source a so called rc file.
This standard procedure does not work on all Cloud locations. Executing source on the
downloaded rc file prompts for a password. This password is not the same you have used when
authenticating to LifeScience in order to access the OpenStack Dashboard.
Internally, OpenStack does not set a local password for your ELIXIR-ID, since it does not need to hence OpenStack confirms your authorization separately via LifeScience AAI. However, the commandline-tools can only function with a set local password. Prior to the new OpenStack release, users had to contact the cloud site administrators in order for them to set an explicit local password and send it back to the user via encrypted mail or de.NBI vault service.
Luckily, there is a new feature since OpenStack Rocky where users are able to set their own local credentials via the dashboard.
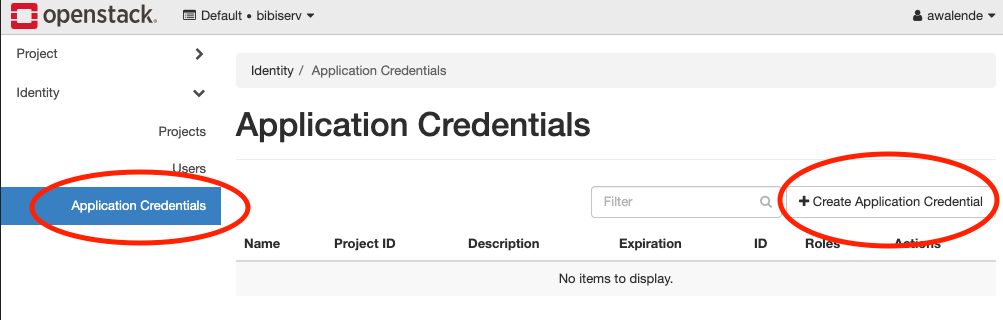
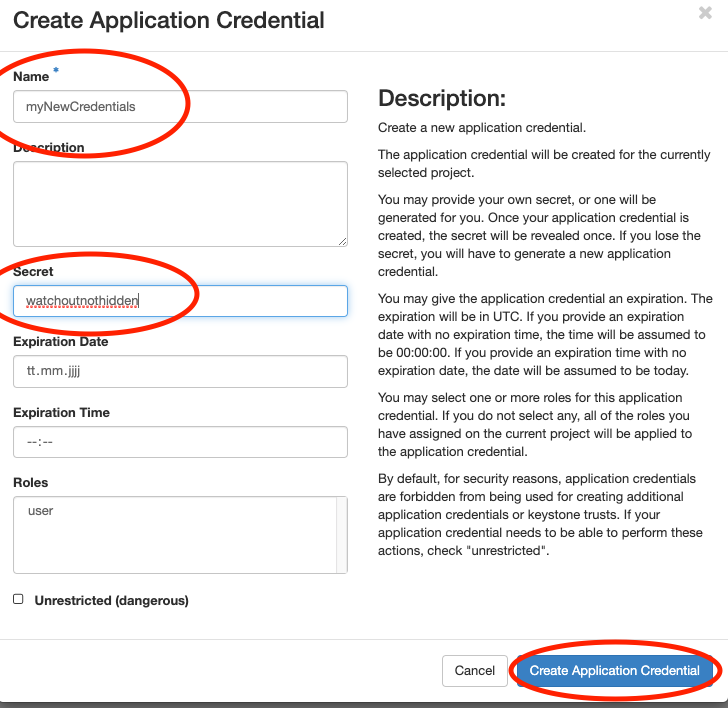
Log in to the OpenStack Dashboard as usual, on the left side navigate to Identity -> Application
Credentials and create a new credential set:
Afterwards, you have to specify your new credential set. You can leave the 'secret' field blank,
OpenStack will autogenerate a long and cryptic password string afterwards. Of course you can also
provide your own secret.
Warning: The secret field is not hidden in the browser!. Afterwards click on Create Application Credential:
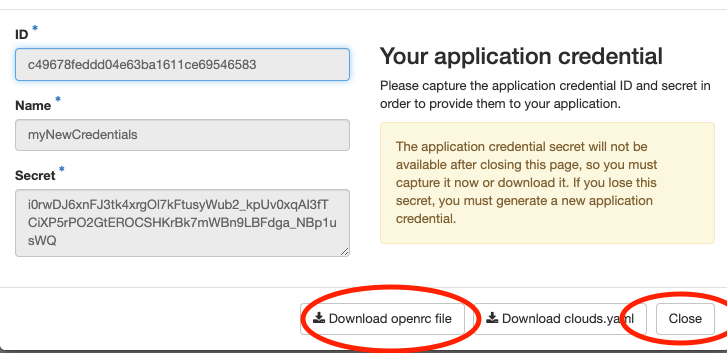
In the new window, you can directly download a generated rc file. Make sure that you explicitly
click on Close afterwards, otherwise the credential won't be saved:
After the credential has been downloaded to your favourite location, you can simply source the file with:
#Depends on your location.
source ~/Downloads/<NAME OF RC FILE>
Now you can use the openstack commandline tools.
Note
Application credentials are currently not supported by all applications or development kits accessing the Openstack API. In this case users have to contact the cloud site administrators in order for them to set an explicit local password.
Instance Metadata
Openstack presents configuration information to instances it starts via a mechanism called metadata.
This metadata can be accessed querying http://169.254.169.254/. Services like cloud-init make use
of this metadata to initialize and configure a started instance.
Beside metadata information in AWS compatible format, Openstack additionally supports metadata in its own style. There are three different kind of metadata which can be accessed by the user.
| Typ | Description |
|---|---|
| Compute data | Structured data containing information about network, hostname, public-key, ... |
| User data | The user has the ability to pass unstructured data like shell scripts, ... to the instance. |
| Vendor data | Optional the cloud provider can make vendor specific information (static or dynamic) availabe |
On request project specific information like all users with their elixir id/name and public-keys can be made available. For example, this information can be used to build up a multi-user instance, giving all users of the project access.
> curl http://169.254.169.254/openstack/latest/vendor_data2.json | jq
>{
"denbi": [
{
"elixir_name": "...",
"id": "...",
"name": "...",
"perun_id": "...",
"public_keys": [
"ecdsa-sha2-nistp256 AAAA...",
]
},
...
]
}
Important: This feature is not active as a default setting and will only be enabled on request.
(Information) Security
Our information security policy (german language)
ensures that we follow defined protocols and procedures.
Clock synchronisation
Our cloud infrastructure and user virtual machines are clock synchronised using the Network Time Protocol (NTP).
Information security incidents
If users become aware of a security incident or notice an abnormal behaviour of their instances (e.g. unexpected high CPU load or high network traffic without actively running anything), they should immediately contact the cloud administrators (os-service@cebitec.uni-bielefeld.de). The administrators will assist in isolating the affected instances from the public network and will (with the owner's consent) start a basic forensic analysis. Depending on the analysis results a security incident report is written and the security incident officer of Bielefeld university is informed. If any personal data is affected, the data security officer is also consulted.
Cryptography
We use cryptographic methods to protect user data stored on our infrastructure:
- Client connections to our OpenStack Dashboard and Openstack API are encrypted using TLS
- Local disks of instances are located on encrypted devices (LUKS)
- Cloud storage is LUKS encrypted
Regular vulnerability scans
We are scanning our external reachable instances regularly for vulnerability's in order to prevent any security incidents. These scans are scheduled daily around midnight and are non-disruptive.
Vulnerabilities are classified either as Low, Middle or High.
If we detect an instance with a HIGH vulnerability:
- We immediately disconnect any network connectivity ingress and egress
- We send you a detailed report about our findings
- We reach out to you and specify the necessary actions in order to fix this issue and restore connectivity.
If we detect an instance with a MEDIUM vulnerability:
- The instance will continue to exist and connect to the internet as usually UNLESS this issue is not fixed in a specified time
- For this, you will also be contacted by us with an attached report
- These reports also give hints on how to fix the listed vulnerability
- You can contact us if you need help in resolving a vulnerability
Current Known Problems
- Spawning large GPU instances can fail after 10~ minutes. These instance have special requirements for main-memory and spawning them can therefore cause timeouts. The solution is simply to try again or pick a flavor which requires less memory. If spawning GPU-instances fail repeatedly, please contact us.
If you notice any issues which are not part of this list, don't hesitate to contact us.
Frequently Asked Questions (F.A.Q)
Automatic A-Records are not created
Automatic DNS A-records following the scheme <instance_name>.<project_name>.projects.bi.denbi.de are removed due to
incompatibility with the new setup. If you wish to have custom A-records, write us a mail with the desired
name and the associate FloatingIP.
I can't connect to my instance via SSH. Why?
This can have many causes. The first crucial troubleshooting-step is to examine the error message when trying to connect to an instance via an ssh client.
If the client times out or throws an error like Destination not reachable:
- Make sure that the instance is running and in an
ACTIVEstate. - Make sure that the instance has a floating-ip attached to it. You can't ssh into an instance which only has a private ip.
- Check the SecurityGroups of your project and allow ingress port for SSH (Port 22).
- You can check this in the OpenStack-Dashboard: Project -> Network -> Security Groups.
- You are using a broken snapshot or image which is not able to configure its internal network configuration
via
cloud-init. - There may be network issues on our side.
If you are receiving Connection refused:
-
Network connectivity to your instance is given and the internal ssh-server is running, but the instance itself is not allowing your connection.
-
You are using a wrong or too open SSH-Key.
- Make sure to use the correct private key-file and that the key on your local machine has correct permissions. Usually only the logged-in user should have access to it. The OpenSSH-Client won't try keys with too open permissions.
-
You are using the wrong remote user.
-
If you are using an ubuntu based image or snapshot, the remote user is
ubuntu. For debian it isdebian. -
The instance is stuck in maintenance-mode.
-
See here on how to resolve this.
-
Something is misconfigured inside your instance.
- The public key in
/home/ubuntu/.ssh/authorized_keysis missing. - The permissions are broken or too open in
/home/ubuntu/or/home/ubuntu/.ssh/. (Too open eg. withchmod 777). - In these cases, you are completely locked out, and you won't be able to access your instance in some way again. In rare and urgent cases, we can manually repair this but for this we need your explicit consent to do so.
- The public key in
My instance is stuck in maintenance mode while booting.
When using a regular OpenStack-Project, you can check this by opening the VNC-Console of the instance.
Click on your instance on the OpenStack-Dashboard and select Console in the tab-menu.
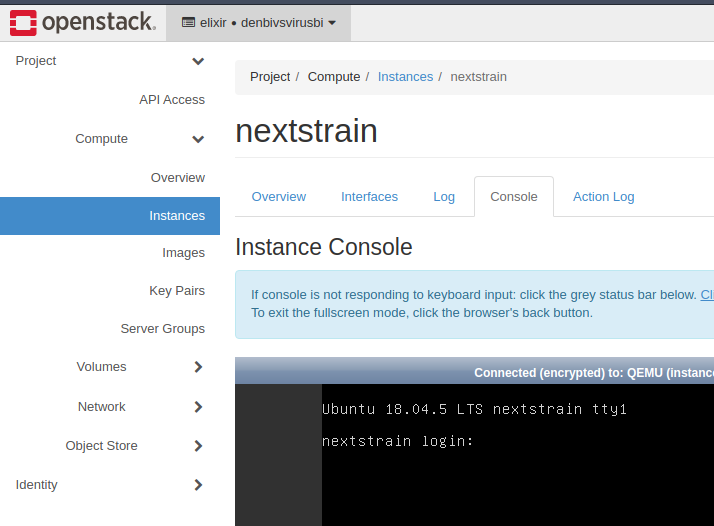
You may confirm the maintenance mode by looking at the last messages in the console:
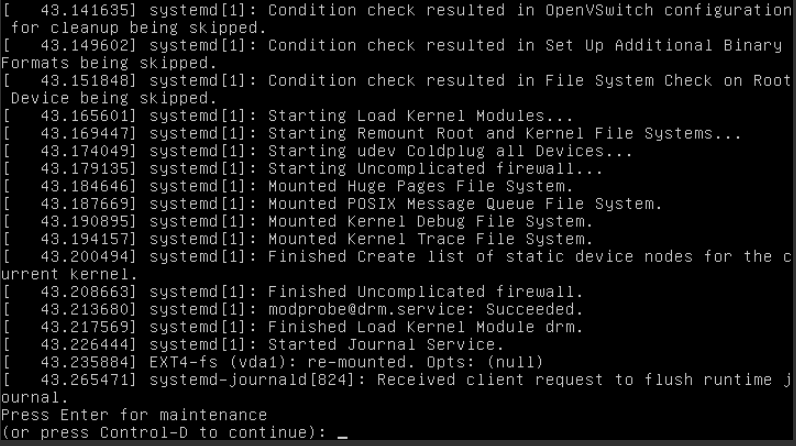
You can then continue the boot process by pressing Control-D.
If the console is not receiving your keystroke, click on the bar beforehand which states Connected(encrypted) to: ....
You should then scan and repair all your filesystems. You can list all your connected filesystems with lsblk.
Afterwards perform a check and repair all issues with (replace the last character with the disk of your choice):
sudo fsck.ext4 /dev/vd[a,b,c]
If you are using a SimpleVM-Project, you are not able to access this console. Please contact the Cloud-Helpdesk.
I can't suspend or shelve my instance
Shelving and suspending is disabled on this installation. Please use the snapshot-functionality instead.
My instance is suddenly listed as Shut Off in the dashboard. Why?
Instances in the cloud can crash like any other machine and therefore can go offline. This can also indicate an issue with our underlying compute infrastructure.
You can try to re-start (Hardreboot) your instance in the dashboard. If this fails for some reason, then there is probably an issue with the underlying compute infrastructure. In this case, please contact us.
If your instance is starting up fine, you can check some log-files which may give you an indication on why the instance went offline. They are usually located here on your instance:
/var/log/kern.log/var/log/syslog