General
The general idea is to create a computing cluster which has worker nodes in different cloud locations. Such a hybridcloud approach would have the benefit that worker nodes can run in cloud locations where the data, they are working on, is located. Thus negating the need to transfer very large amounts of data between different cloud locations. Calculated results are usually much smaller in size and can be transferred back to the master node very swiftly.
Experimental Setup
This section will describe a proof of concept of such a hybrid cloud approach. This minimal setup will consist of a cluster created with BiBiGrid running in the Bielefeld cloud. This cluster will consist of one master and one worker node. Additional a VPN node, a pseudo master which just relays traffic between the two cloud locations, and a worker node will be created in the Gießen cloud. The master node and the VPN node will be connected over a VPN created with Wireguard. The local workers in turn are connected to their master/VPN node via their local subnet.
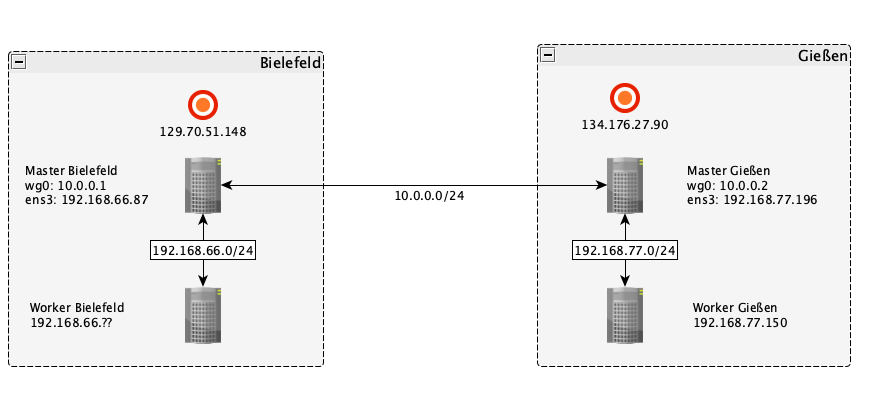
The diagram shows the described setup. Note that the IPs attached to the red
circles are the public floating IPs of the corresponding master and VPN node
and that they will most definitely differ in your setup. wg0 signifies
the Wireguard VPN interface, the IPs will be set in the
Configure Wireguard section.
The master and worker node in Bielefeld are part of a subnet with an IP range of
192.168.66.0/24 whereas the subnet in Gießen has the range 192.168.77.0/24.
The ranges can be freely chosen while setting up the subnets, but the ranges of
different cloud locations should not overlap.
Create Setup
For the cluster in Bielefeld and Gießen follow the steps in the Quickstart Tutorial up to the point of launching your own instance. For Bielefeld proceed by creating a cluster using BiBiGrid. Then for Gießen launch two instances, as described here. Create one Instance which will be the VPN node, this node only relays traffic, so it is enough to choose a minimal flavor. Then create a second instance which will be a remote worker node.
Install Wireguard
Wireguard is only needed to connect the master node with the VPN node therefore you only need to install it on these instances. To install the necessary packages and dependencies on Ubuntu, you can run:
$ sudo apt install wireguard
For other operating systems take a look at the installation instructions on the official wireguard site.
After successfully installing the package run the following to create a directory which will hold the keys, and the config file:
$ sudo mkdir /etc/wireguard
Generate key pairs
Got to the directory you just created:
$ cd /etc/wireguard/
Then run the following two commands to generate a private key and the corresponding public key:
$ umask 077 # This is to make sure that credentials don't leak
$ wg genkey | tee privatekey | wg pubkey > publickey
You can simply display the keys to the terminal like this:
$ cat privatekey
$ cat publickey
Configure Wireguard Interfaces
With Wireguard we can create a VPN interface from a config file.
For both the master node and the VPN node create a config file inside
/etc/wireguard:
$ nano wg0.conf
The following is the config file for the master node in Bielefeld.
The group [Interface] holds options about the interface that will be created
on the local machine. Here Address signifies the IP address the master node will
have in the VPN. Privatekeyis the private key of the master node which we
generated earlier and ListenPort is the port on which the Wireguard interface
will send its packages. The group [Peer] holds information and options about
a specific peer, which we want to be able to connect to our interface.
PublicKey is simply the public key of the peer, in our setup the peer is the
VPN node in Gießen. AllowedIPs signifies which packages will be let through
our interface. Of course we want to accept all packages from inside our VPN
therefore we add 10.0.0.0/24 but since only the VPN node is part of the VPN
we wouldn't be able to receive packages from the worker nodes in Gießen without
also allowing the local subnet. Lastly Endpoint specifies the public IP and UDP
port of the respective remote host which Wireguard will use to establish the
VPN connection.
# Config Master node Bielefeld

[Interface]
Address = 10.0.0.1/24
PrivateKey = <privatekey of master node Bielefeld>
ListenPort = 51820

[Peer]
PublicKey = <publickey of VPN node>
AllowedIPs = 10.0.0.0/24, <subnet in Gießen>
Endpoint = <public ip and port of master node in Gießen>

PersistentKeepalive = 25
The config for the VPN node in Gießen follows the same principals.
# Config VPN node Gießen

[Interface]
Address = 10.0.0.2/24
PrivateKey = <privatekey of VPN node>
ListenPort = 51820

[Peer]
PublicKey = <publickey of master node>
AllowedIPs = 10.0.0.0/24, <subnet in Bielefeld>
Endpoint = <public ip and port of master node in Bielefeld>

PersistentKeepalive = 25
Adjust Security Groups
Wireguard sends traffic over its interface as UDP packets. So we have to make sure that our security group in Bielefeld and Gießen allow incoming UDP packets from each other. Therefore, you would have to add the following rule:
| Direction | Ether Type | IP Protocol | Port Range | Remote IP Prefix |
|---|---|---|---|---|
| Ingress | IPv4 | UDP | 51820 | public ip of master/VPN node |
Connect the nodes
To connect the nodes via our VPN we first have to create the interfaces. On master node run the following:
$ wg-quick up wg0
If everything was set up correctly you will get this output:
[#] ip link add wg0 type wireguard
[#] wg setconf wg0 /dev/fd/63
[#] ip -4 address add 10.0.0.1/24 dev wg0
[#] ip link set mtu 1370 up dev wg0
[#] ip -4 route add <subnet Gießen> dev wg0
Then repeat the same on the VPN node. The to test if a connection could be established run the following from the master node:
$ wg
If everything works correctly you should get the following output:
interface: wg0
  public key: xxxxx
  private key: (hidden)
  listening port: 51820

peer: xxxxx
  endpoint: <public ip VPN node Gießen>:51820
  allowed ips: 10.0.0.0/24, <subnet in Gießen>
  latest handshake: xxx seconds ago
  transfer: xxx B received, xxx B sent
  persistent keepalive: every 25 seconds
If a connection couldn't be established the lines endpoint:,
latest handshake: and transfer: will be missing.
You can actually run the wg command from either node, running it from
master node was only advised so that it was easier to compare outputs. Also note
that the connection will be established immediately after both interfaces are
up and running. The wg command just prints some info to the terminal.
Exempt traffic from Anti-Spoofing measures
Neutron prevents an instance from sending or receiving traffic with an IP which is not part of its Neutron port. More information can be found here and here (Section:ML2/Open vSwitch port-security) . For our setup we will need to add allowed address pairs for the master nodes and the workers running in a different location. This can be done by using the following openstack command:
$ openstack port set <port-id> --allowed-address <ip-address to allow>